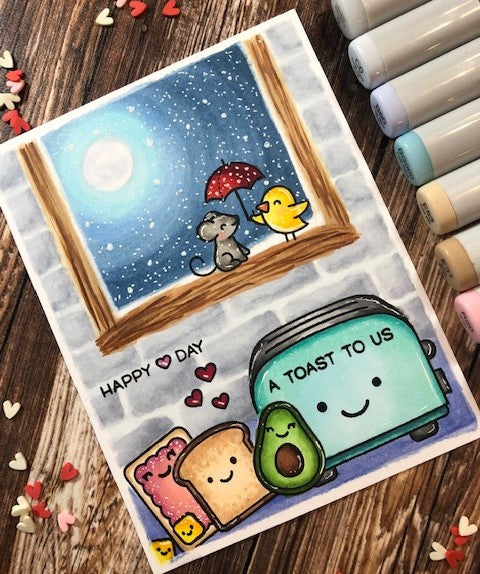
Step 1: Trim 110lb Neenah solar white cardstock into a 4.25 inch by 5.5 inch card panel.
Step 2: Create masks for all images used on card panel. To do so, stamp images on masking paper and cut each one out.
Step 3: Stamp avocado on bottom center of card panel and then apply mask to avocado. Stamp and mask remaining images as seen on card in this order: toaster, toast, butter pats, pop tart. Use a ruler and C0 copic marker to draw in window at top of scene. Draw two vertical lines 1.5 centimeters from each edge of panel from top of card to center of card. Draw two parallel horizontal lines at center of the card to create windowsill.
Step 4: Draw a horizontal line one inch above bottom of card panel to create the kitchen counter the toaster, toast, etc. are resting on.
Step 5: Create the brick wall by drawing 1 inch by 0.5 inch rectangles across the page from top to the countertop using a C1 marker. Stagger each row of rectangles. Add shading with C3 marker in an L-shape, starting at the top right hand corner and ending at bottom left hand corner. Blend the C3 into the C1 using a C0 marker. Shade in the kitchen counter using B60, B63 and B66 copic markers.
Step 6: Color the avocado using copic markers in G20, YG13, YG17, YG67, YG97, E23, E27, and E29. Color the toaster using BG000, BG11, BG13, BG18, T0, T2, T4, and T6. Color the toast using E51, E53, E55, E23, and E27 and make “crumbs” in the bread by making small dots around the edge of the bread using the tip of the E53 and E55 markers. Color the pop tart using E50, E53, E55, R20, RV32, and RV34. Color the butter with Y13, Y17 and Y19 markers.
Step 7: Make the wood grained window sill by covering base of window with an E31 marker and adding streaks of E35, E47, E27, or whatever dark brown markers you have.
Step 8: Stamp and mask the mouse, bird, and umbrella on the windowsill.
Step 9: Add a moon to the window scene by drawing in a one inch circle in the upper left hand corner of the window using a C0 marker. Add the evening sky by applying rims of color around the moon starting with B000, B21, B91, B95, and B97 until the color reaches the borders of the window and blend colors together.
Step 10: Color the umbrella using R14, R29, and R39. Color the bird using Y11, Y13, Y18, Y19, YR15, and YR18. Color the mouse using W1, W3, W5, and R20.
Step 11: Add finishing touches to card: Stamp trio of hearts above the toast and avocado.
Color the hearts using R46. Stamp smiley faces on the avocado, toast, toaster, butter pats, and pop tart using black versafine ink. Stamp sentiment onto the card panel using black versafine ink. Add highlights to the images with a white gel pen. Add snow to the window scene using a white gel pen.
Instagram: antonia.florence
YouTube Channel: Taffleberry Lane
Items Used:
Lawn Fawn Stamp Let’s Toast LF1820
Lawn Fawn Die Let's Toast LF1821
Lawn Fawn Stamp Elphie Selfie LF1328
Lawn Fawn Die Elphie Selfie LF1329
Lawn Fawn Stamp Sweet Friends LF1551
Lawn Fawn Die Sweet Friends LF1552
Tsukineko Memento Ink Tuxedo Black ME-000-900
Copic Sketch Markers Used:
C0 C1 C3 B60 B63 B66 G20 YG13 YG17 YG67 YG97 E23 E27 E29 BG000 BG11 BG13 BG18 T0 T2 T4 T6 E51 E55 E23 E27 E53 E51 E50 R20 RV32 RV34 Y13 Y17 Y19 E31 E35 E47 B000 B21 B91 B95 B97 R14 R29 R39 Y11 Y18 YR15 YR18 W1 W3 W5 R20


